Selling on Shopify in 2022: A Step-by-Step Guide
Are you thinking about selling on Shopify? Getting your eCommerce store up and running only takes a few simple steps. You’ll have a professional-looking internet storefront ready to take orders in no time!
In this step-by-step guide, we’ll walk you through everything you need to know to start selling on Shopify. We’ve also included how to sell on platforms like Instagram, Facebook, and Pinterest with Shopify.
Bonus: Learn how to sell more products on social media with our free Social Commerce 101 guide. Delight your customers and improve conversion rates.
How to start selling on Shopify in 10 easy steps
You likely already have a business plan with an idea of what you’re going to sell and who your target audience is for online selling. If you don’t, creating one, sourcing your products, and branding your organization should be your first step.
Otherwise, here’s how to sell on Shopify in ten easy steps.
1. Buy a domain name
Buying a domain name is a pretty important step. A domain name is like your internet address. You want it to be easy to remember and, above all, relevant to your business.
Shopify offers a free URL, but it won’t rank well. It looks like this [yourshopifystore.shopify.com], so it has the added disadvantage of shoehorning ‘Shopify’ into the URL.
When you first sign up to Shopify, it will ask you for your store name. Then, it will use your store name to create a free URL for you. You can change this after you sign up by:
- Logging into Shopify admin on your desktop computer
- Navigating to the Sales channels section
- Hitting Online Store
- Navigating to Domains
- Clicking the Change primary domain link
- Selecting your new domain from the list
- Hitting Save
Choose a domain name that is the same or close to your brand name. Your social media accounts should also be similar to your brand name. This way, customers can find you online through search engines easily.
You can buy a domain name by visiting major registrars, such as A2 or GoDaddy. It’s relatively straightforward, so long as no one has taken your desired domain name. You’ll need to provide payment information for this transaction before it’s complete, but once done, that domain name is yours!
2. Select and customize a Shopify Store template
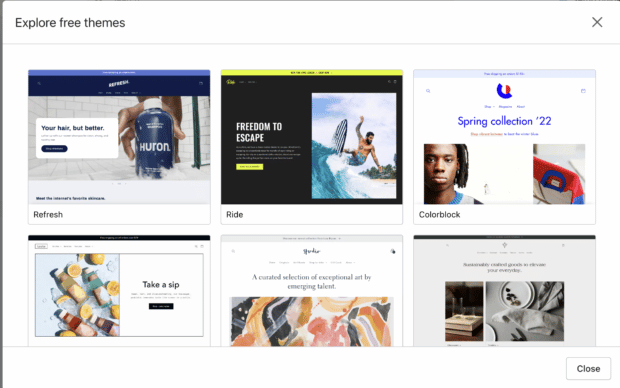
You’ll want to customize the look and feel of your online store. Luckily. Shopify offers a wide selection of themes, both free and for purchase.
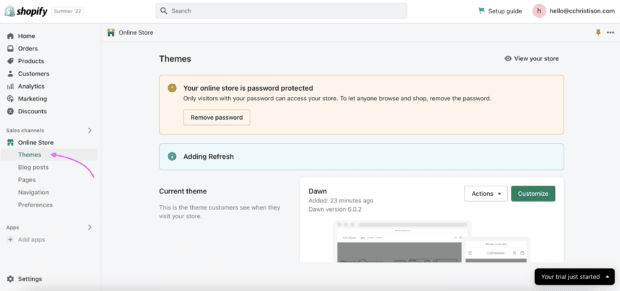
You can find them on the left-hand menu under Themes.
Source: Shopify
Your theme organizes your store, sets the features, and decides on the style. Take the time to look through the themes available; different layouts can give your customers different experiences.
Once you’ve chosen a theme, you can customize your content, layout, and typography. If you click Customize, you’ll be taken to an editing site where you can start making your store your own. As you customize your theme, ensure everything is aligned with your brand.
3. Upload your inventory
Once you have your Shopify Store template in place, it’s time to upload your products. You can do this in the Shopify Admin space you’ve already been operating in.
Here’s how:
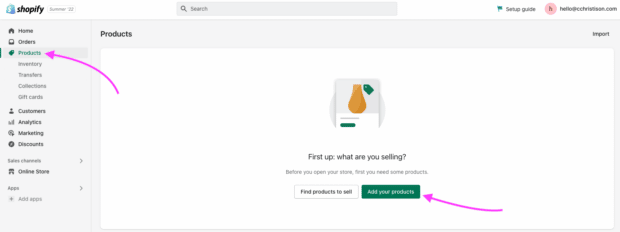
1. Navigate to Products on the left-hand menu
2. Click Add products
3. Fill in all of the information about your product and upload any photos
4. Click Save
Uploading your inventory manually can take time if you have a lot of products. Luckily, you can bulk upload your inventory if you have it in a CVS file in four easy steps:
1. Navigate to Products from your Shopify Admin
2. Click Import
3. Click Add file, and then select the CSV file that has your products in it
4. Click Upload and continue
Inventory management is an important part of store upkeep. Keep your product pages up to date to start building an ongoing successful eCommerce store.
4. Set up payment methods
When someone clicks the buy button, they’re ready to purchase. You want to make your customer’s shopping experience as seamless as possible in order to not lose that transaction fee.
Set up the secure Shopify checkout to accept orders and take payments through your Shopify store. When a customer adds a product to their cart, it’s checked against your store’s inventory levels. If the inventory is available, then it is held for the customer while they complete the payment.
Go to your Checkout settings page in your Shopify admin to view and change your checkout settings. Add your business banking info so there will be somewhere to transfer the funds.
From there, you can also choose to collect customer email addresses during the payment process to use later for email marketing purposes.
5. Decide on shipping procedures and set up your shipping rates
Before you take your first order, you must decide how that order will get to your customer. There are four main ways you can go about this:
- Dropshipping
- Retailer Shipping
- Local delivery
- Local pickup
Dropshipping is when you use a supplier who holds your inventory and ships your product. You’ll pay wholesale prices to the supplier, but you can decide how much you charge your site visitors.
Dropshipping is popular because it saves you from inventory costs like storage or product waste. Your supplier keeps your products in a fulfillment center, and you simply purchase the amount you need from them. They ship your products to your customers for you.
Dropshipping is great for folks just starting out because of the low overhead. But, it does have drawbacks.
With dropshipping, you can’t control the amount of inventory you have. If your supplier runs out, it’s your problem. You also have limited branding control as you’ll depend on the supplier to brand your products. And, you won’t have control over the shipping — your dropshipper might send one order of three items out three different times, charging you shipping for each product.
Your other shipping option is to do it yourself. This way, you have complete control over your packaging, shipping methods, and branding. If part of your brand is to provide a beautifully curated experience right down to the packaging and unboxing, then this may be right for you.
Shipping as a retailer is more labor-intensive than dropshipping. You’ll have to package products yourself, use a shipping courier like DHL or FedEx, and ensure you incorporate shipping costs into your eCommerce model.
Local delivery and pickup are pretty straightforward. You’ll still have to package your products and keep track of your inventory.
With local delivery, collect your customers’ addresses and either drop off packages yourself or use a local courier service. For local pickup, give your customers clear directions on how to grab their packages from you.
6. Add Pages, Navigation, and adjust your Preferences
You’ll see the option to add Pages, Navigation, and Preferences on your left-hand menu bar. In Pages, add any extra site pages your customers might be interested in, like your brand’s story in an About Us section.
Under Navigation, you can make sure your menus are clear for your shop visitors. Nothing stops a user in their tracks like a site with bad UX.
You’ll want to ensure your Shopify Store is set up for SEO, which you can do under Preferences. Add your Page’s title and meta description here. This is what will show up on the Search Engine Response Page (SERP) when people search for your company. Engines like Google also use this to match your store with searches, so be sure to include relevant keywords here.
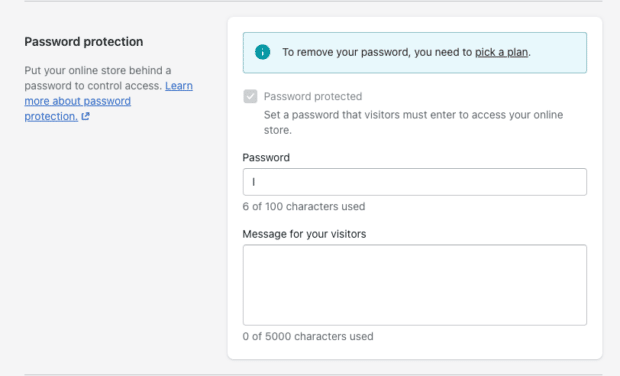
In this section, you can link Google Analytics and Facebook Pixel and decide on how you’ll collect user data. Close to the bottom of this page, you’ll see a box that says your site is Password Protected.
Once you are ready to go live with your store, remove your password and click pick a plan.
Bonus: Learn how to sell more products on social media with our free Social Commerce 101 guide. Delight your customers and improve conversion rates.
Get the guide now!7. Go live
Pick a Shopify Plan! There are many touch points on your Shopify Admin to navigate to their plans. They make it pretty easy to give them money. But, if you’re a bit lost, head to Home on the left-hand menu. In the bar across the top of your screen, choose Select a plan.
From here, you just have to decide which plan is right for you.
8. Connect your store to your social media accounts
To add your social media accounts to your Shopify store, choose a theme that already has them embedded. You can find these by searching ‘social media’ in the Theme Store.
Or, you can check if the theme you’re already using supports it by clicking on the footer or area of your choice, then on the right menu, navigate to the Social media icons section and click Show social media icons.
If you’re looking to connect your social media accounts to Shopify to sell on them, see below.
9. Set up a Shopify chatbot
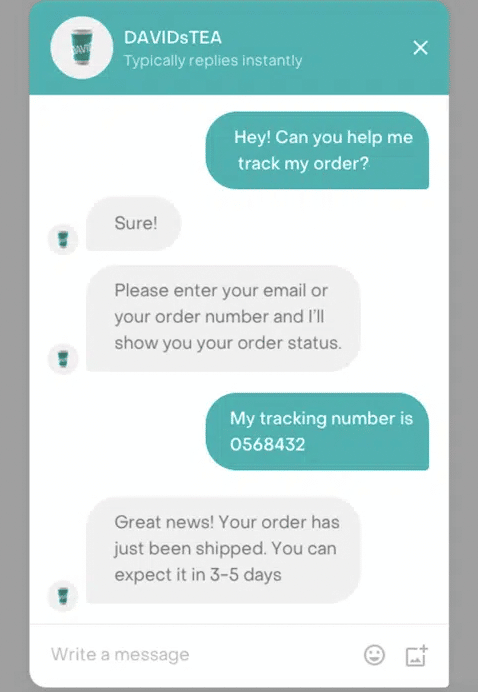
Once your store is set up, you’ll want to invest in a Shopify chatbot. Shopify chatbots can automate tasks for you, saving you time and money.
First, find out which chatbot is right for your store. We recommend our sister chatbot, Heyday, as it works for almost all eCommerce business models. Plus, the easy-to-operate interface makes it a breeze to integrate.
Heyday can connect a site visitor remotely with store associates via live chat and video calls.
Source: Heyday
Try a 14-day free Heyday trial
10. Integrate Hootsuite
Your last step will make your life much easier while running your shop. Integrate Hootsuite to your Shopify store with Shopview. You’ll be able to share products from your store to your social networks easily.
How to sell on social media with Shopify
Did you know you can sell through your Shopify store directly on many social media platforms? This lets you sell and market where your customers prefer to shop.
How to sell on Facebook with Shopify
Selling on Facebook with Shopify is easy; there are a few simple steps to get there.
Make sure you are the admin for your Facebook Business Manager
In order to sell on Facebook with Shopify, you have to have a Facebook ad account and be the admin for your Facebook Business Manager. Under your Facebook Business Manager, you should own your brand’s Facebook Page. You’ll need these accounts to connect to your Facebook channel in Shopify.
Install the Facebook channel in Shopify
You’ll need to log in to your Shopify store on a desktop computer first. Then, navigate to your Shopify admin page.
- Click Settings
- Click Visit the Shopify App Store
- Search for Facebook
- Click Add channel
- Choose the feature you want to install (like Facebook Shop) and click Start set up
- Click Connect account
- Sign in to your Facebook account
- Follow the prompts to connect the Facebook assets that are required for set up
- Accept the terms and conditions
- Click Finish setup
Start selling and marketing on Facebook
Your product category will automatically upload to your Facebook Shop when you install the Facebook Shop Shopify feature. So, you’re simply left to market and sell your products on Facebook!
What if I already have a Facebook Shop set up?
If you’ve already set your Facebook Shop up, it’s no problem. You can easily integrate Shopify into your shop by following the above instructions.
Here’s how to set up your Facebook Shop through Meta instead of Shopify.
How to sell on Instagram with Shopify
You need to do a few things to sell on Instagram with Shopify.
Make sure your Facebook business page is connected to your Professional Instagram account
Meta owns Facebook and Instagram. To integrate your Shopify store into your Instagram account, ensure your Facebook business page is connected to your professional Instagram account.
Find out how to convert your personal Instagram account to a professional account here.
Install the Facebook channel
Follow the steps above to install the Facebook channel to your Shopify account.
Install the Instagram Shop feature
After you have the Facebook channel integrated to your Shopify account, you will need to install the Instagram Shop feature. Head to your Shopify admin page.
- In Settings, navigate to Apps and sales channels
- Click Facebook
- Click Open sales channel
- Click Overview
- In the Instagram Shopping section, click Set up to start
- Connect your Facebook accounts to the Facebook sales channel if you haven’t already
- Accept the terms and conditions, then click Request approval
- Wait for Facebook to review your products (this could take 24-48 hours)
Start selling!
Now you’re ready to start selling on Instagram! The Hootsuite Insta-experts have compiled some Instagram Shopping cheat codes (AKA what to do to sell more) just for you.
How to sell on Pinterest with Shopify
Selling on Pinterest with Shopify is incredibly easy. Plus, it has the potential to put your products in front of 400 million Pinterest users.
Add the Pinterest sales channel to your Shopify store
Basically, all you need to do to sell products on Pinterest is add the Pinterest sales channel to your store.
- Make sure you’re logged into your Shopify account
- Go to the Pinterest app
- Click Add App
- Follow the prompts to install the Pinterest app on Shopify
Once installed, Buyable Pins for all of your products on Pinterest are enabled. This means users can browse through Pinterest and buy your products. Shopify will take care of the synchronization of data for these purchases for you.
Have you manually added Pinterest tags?
If you’ve manually added Pinterest tags to your Shopify account, you will need to remove them before integrating the Pinterest Shopify app. Don’t worry, you can add them back again later.
The Hootsuite Pinterest professionals have strategized an edge for your Pinterest shopping strategy here.
Selling on Shopify FAQ
What can you sell on Shopify?
On Shopify, you can sell products and services (digital and physical), so long as they comply with Shopify’s values and are not illegal.
Shopify’s Acceptable Use Policy says they believe in a “free and open exchange of ideas and products.” Stating this free and open exchange is a key tenet of commerce, however, there “are some activities that are incompatible with Shopify’s mission to make commerce better for everyone.”
Those activities include things like child abuse, illegal substances, and services from terrorist organizations. If you’re trying to monetize say, your templated social media strategies or your Grandma’s home-baked pies, you’re likely good. Unless Grandma uses some wild ingredients.
Why should you sell on Shopify?
Shopify’s one of the largest eCommerce platforms for a reason. They boast a scale of affordable pricing plans for all sizes of stores and an easy-to-use back end. It’s an attractive choice for store owners of any digital skill set.
Shopify can scale as you grow your business. They have an entire ecosystem of digital tools out there that can integrate into your shop, like chatbots to help with customer service inquiries.
How much does it cost to sell on Shopify?
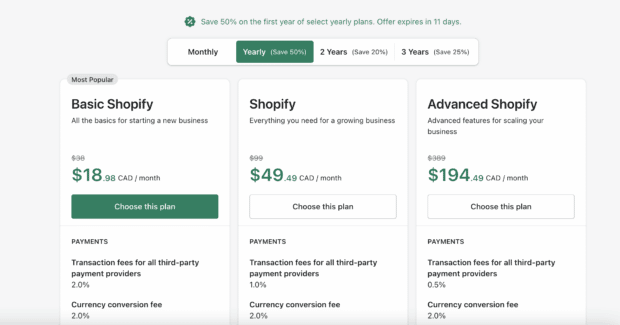
Pricing packages range from $38/month for the Shopify Basic plan, $99/month for the Shopify plan, to $389/month for the Advanced plan. So, how much it costs to sell on Shopify is up to you and the plan you choose.
That being said, if you sign up for a free 14-day trial (like I did) Shopify may offer you a 50% discount on your first year.
There are, however, other costs associated with selling on Shopify. If you’re wondering exactly how much it costs to sell on Shopify, you’ll need to work out your expenses. Those might include your internet bill, the price of your packaging, your shipping costs, the cost of your branding, or promotional efforts.
How do I start selling on Shopify?
If you’ve followed steps one through eight in the above section, How to start selling on Shopify in 8 steps, congratulations! Your store is live, and you are all set up to start selling on Shopify.
Now, it’s time to market your brand and advertise your products or services so you can get your first sale. Make sure you’ve followed social commerce best practices for best results.
Can I sell on Shopify through social media platforms?
Yes! You can sell products on your social media platforms like Facebook, Instagram, and Pinterest. Shoppers can browse your products and then check out directly in the apps. And setting up your shops is easy; see above for instructions.
Engage with shoppers on social media and turn customer conversations into sales with Heyday, our dedicated conversational AI chatbot for social commerce retailers. Deliver 5-star customer experiences — at scale.
Get a 14-day free Heyday trial
Turn your Shopify store visitors into customers with Heyday, our easy-to-use AI chatbot app for retailers.
Try it FreeThe post Selling on Shopify in 2022: A Step-by-Step Guide appeared first on Social Media Marketing & Management Dashboard.
Categories
- 60% of the time… (1)
- A/B Testing (2)
- Ad placements (3)
- adops (4)
- adops vs sales (5)
- AdParlor 101 (43)
- adx (1)
- algorithm (1)
- Analysis (9)
- Apple (1)
- Audience (1)
- Augmented Reality (1)
- authenticity (1)
- Automation (1)
- Back to School (1)
- best practices (2)
- brand voice (1)
- branding (1)
- Build a Blog Community (12)
- Case Study (3)
- celebrate women (1)
- certification (1)
- Collections (1)
- Community (1)
- Conference News (1)
- conferences (1)
- content (1)
- content curation (1)
- content marketing (1)
- contests (1)
- Conversion Lift Test (1)
- Conversion testing (1)
- cost control (2)
- Creative (6)
- crisis (1)
- Curation (1)
- Custom Audience Targeting (4)
- Digital Advertising (2)
- Digital Marketing (6)
- DPA (1)
- Dynamic Ad Creative (1)
- dynamic product ads (1)
- E-Commerce (1)
- eCommerce (2)
- Ecosystem (1)
- email marketing (3)
- employee advocacy program (1)
- employee advocates (1)
- engineers (1)
- event marketing (1)
- event marketing strategy (1)
- events (1)
- Experiments (21)
- F8 (2)
- Facebook (64)
- Facebook Ad Split Testing (1)
- facebook ads (18)
- Facebook Ads How To (1)
- Facebook Advertising (30)
- Facebook Audience Network (1)
- Facebook Creative Platform Partners (1)
- facebook marketing (1)
- Facebook Marketing Partners (2)
- Facebook Optimizations (1)
- Facebook Posts (1)
- facebook stories (1)
- Facebook Updates (2)
- Facebook Video Ads (1)
- Facebook Watch (1)
- fbf (11)
- first impression takeover (5)
- fito (5)
- Fluent (1)
- Get Started With Wix Blog (1)
- Google (9)
- Google Ad Products (5)
- Google Analytics (1)
- Guest Post (1)
- Guides (32)
- Halloween (1)
- holiday marketing (1)
- Holiday Season Advertising (7)
- Holiday Shopping Season (4)
- Holiday Video Ads (1)
- holidays (4)
- Hootsuite How-To (3)
- Hootsuite Life (1)
- how to (5)
- How to get Instagram followers (1)
- How to get more Instagram followers (1)
- i don't understand a single thing he is or has been saying (1)
- if you need any proof that we're all just making it up (2)
- Incrementality (1)
- influencer marketing (1)
- Infographic (1)
- Instagram (39)
- Instagram Ads (11)
- Instagram advertising (8)
- Instagram best practices (1)
- Instagram followers (1)
- Instagram Partner (1)
- Instagram Stories (2)
- Instagram tips (1)
- Instagram Video Ads (2)
- invite (1)
- Landing Page (1)
- link shorteners (1)
- LinkedIn (22)
- LinkedIn Ads (2)
- LinkedIn Advertising (2)
- LinkedIn Stats (1)
- LinkedIn Targeting (5)
- Linkedin Usage (1)
- List (1)
- listening (2)
- Lists (3)
- Livestreaming (1)
- look no further than the new yorker store (2)
- lunch (1)
- Mac (1)
- macOS (1)
- Marketing to Millennials (2)
- mental health (1)
- metaverse (1)
- Mobile App Marketing (3)
- Monetizing Pinterest (2)
- Monetizing Social Media (2)
- Monthly Updates (10)
- Mothers Day (1)
- movies for social media managers (1)
- new releases (11)
- News (72)
- News & Events (13)
- no one knows what they're doing (2)
- OnlineShopping (2)
- or ari paparo (1)
- owly shortener (1)
- Paid Media (2)
- People-Based Marketing (3)
- performance marketing (5)
- Pinterest (34)
- Pinterest Ads (11)
- Pinterest Advertising (8)
- Pinterest how to (1)
- Pinterest Tag helper (5)
- Pinterest Targeting (6)
- platform health (1)
- Platform Updates (8)
- Press Release (2)
- product catalog (1)
- Productivity (10)
- Programmatic (3)
- quick work (1)
- Reddit (3)
- Reporting (1)
- Resources (34)
- ROI (1)
- rules (1)
- Seamless shopping (1)
- share of voice (1)
- Shoppable ads (4)
- Skills (28)
- SMB (1)
- SnapChat (28)
- SnapChat Ads (8)
- SnapChat Advertising (5)
- Social (169)
- social ads (1)
- Social Advertising (14)
- social customer service (1)
- Social Fresh Tips (1)
- Social Media (5)
- social media automation (1)
- social media content calendar (1)
- social media for events (1)
- social media management (2)
- Social Media Marketing (49)
- social media monitoring (1)
- Social Media News (4)
- social media statistics (1)
- social media tracking in google analytics (1)
- social media tutorial (2)
- Social Toolkit Podcast (1)
- Social Video (5)
- stories (1)
- Strategy (603)
- terms (1)
- Testing (2)
- there are times ive found myself talking to ari and even though none of the words he is using are new to me (1)
- they've done studies (1)
- this is also true of anytime i have to talk to developers (1)
- tiktok (8)
- tools (1)
- Topics & Trends (3)
- Trend (12)
- Twitter (15)
- Twitter Ads (5)
- Twitter Advertising (4)
- Uncategorised (9)
- Uncategorized (13)
- url shortener (1)
- url shorteners (1)
- vendor (2)
- video (10)
- Video Ads (7)
- Video Advertising (8)
- virtual conference (1)
- we're all just throwing mountains of shit at the wall and hoping the parts that stick don't smell too bad (2)
- web3 (1)
- where you can buy a baby onesie of a dog asking god for his testicles on it (2)
- yes i understand VAST and VPAID (1)
- yes that's the extent of the things i understand (1)
- YouTube (13)
- YouTube Ads (4)
- YouTube Advertising (9)
- YouTube Video Advertising (5)

