How to Make Your Own Instagram AR Filters: A Step-by-Step Guide
If your brand uses Instagram for business, you’re probably already aware that Instagram Stories is an effective way to engage with young users. In 2019, 500 million accounts used Instagram Stories every day and 67% of all Instagram users are ages 18 to 29. Stories’s interactive features—like polling, questions, and Instagram AR filters—are fun ways for brands to engage those users. (Not sure how Instagram Stories can build your brand? We’ve got tips to help you use it like a pro.)
Augmented reality (AR) sounds futuristic, but Instagram Stories has used augmented reality filters since 2017 when it launched its face filters. And recently, Instagram Stories took augmented reality to a new level. The Facebook-owned platform Spark AR Studio lets users create their own interactive AR filters. In August 2019, that platform was opened to the public.
Now, anyone can create custom AR filters for Instagram Stories.
Here, learn what Instagram AR filters are, why creating unique filters might be right for your brand, and how to get started with Spark AR Studios.
Download your free pack of 20 customizable Instagram Stories templates now. Save time and look professional while promoting your brand in style.
What’s an Instagram AR filter?
Augmented reality (AR) filters are computer-generated effects layered over the real-life image your camera displays. In Instagram Stories, an AR filter alters the image your front or back camera displays.
Think of Instagram’s face filters. For example, the puppy filter superimposes a dog’s ears and nose over top of your image. Those digital effects move with you as you move.
Or its “Hello 2020” filter: 2020 glasses are superimposed onto your face and digital balloons fall down the screen.
Keep in mind that Instagram AR filters are different from its preset filters. Instagram’s preset filters elevate the quality of photos in one click, so you don’t need to spend lots of time editing photos for Instagram. In contrast, Instagram AR filters are an interactive element only for Instagram Stories.
What’s new with Instagram Stories AR filters?
At its F8 Conference in May 2019, Facebook announced that anyone can build custom AR filters using its Spark AR Studio platform. This new platform allows users to create original augmented reality effects for Instagram Stories, Facebook Stories, Messenger and Portal.
Before this platform became public in August 2019, Instagram users had to be invited to use Spark AR. That meant only select Instagram users could design and publish custom AR filters. Now, anyone who downloads Spark AR Studio can get creative with filters.
It’s easy for Instagram users to find these filters. Anyone visiting your brand’s Instagram profile can click the new face icon. All the AR filters you create are compiled here.
Click on the new face icon (third icon from left) while visiting a user’s profile to see all the filters they’ve made.
![]()
Plus, Instagram users can discover original filters in the new Effect Gallery. However, branded or promotional posts will not show here.
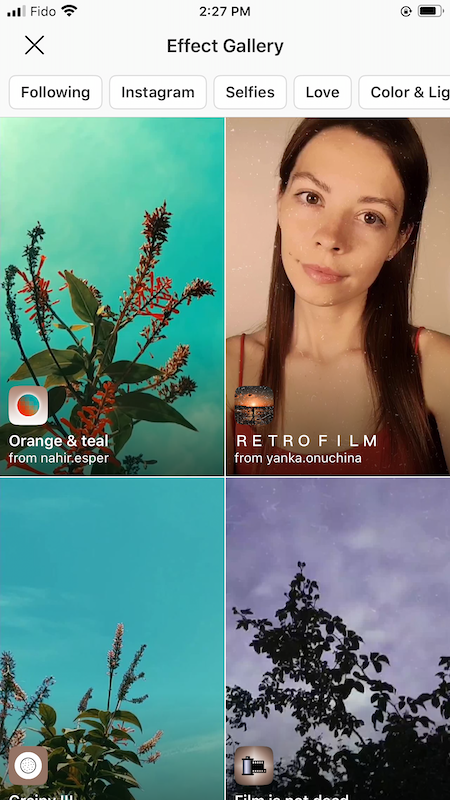
Original AR filters are categorized in the Effect Gallery. There are categories like “selfies” and “color and light.”
Why create AR filters for Instagram Stories?
While this tool might not be right for all businesses, it’s a great option for brands trying to reach younger individuals on Instagram. Remember: 67% of all Instagram users are ages 18 to 29. Additionally, one-third of the most viewed Instagram Stories are from businesses.
Here are a few examples of how custom AR filters could leverage your brand:
Show off your brand’s personality
- Custom AR filters reflect your brand’s tone, especially if that tone is fun or playful.
- They also often reflect the unique parts of your brand, helping you stand out from your competitors.
Connect with your audience
- In 2019, more than 500 million accounts engaged with Instagram Stories daily.
- 60% of businesses using Instagram Stories incorporate an interactive element to increase monthly engagement.
- Custom AR filters are the latest interactive element for Instagram Stories.
Be ahead of the curve
- Custom AR filters are still a new feature, and not every brand is using them yet.
- Create an AR filter for customers to “try on” a product before making a purchase or “wear” a branded item of clothing.
- It’s not just for self-promotion. You could also create a filter for your brand to show your support for social causes.
Increase brand awareness
- Incorporate your brand’s logo or mascot into an AR filter.
- If your unique filter is not promotional, it will display in Instagram’s Effect Gallery where anyone (including new followers) can find it.
- When users share selfies using your filter, their followers (and potential new followers) will be exposed to your brand.
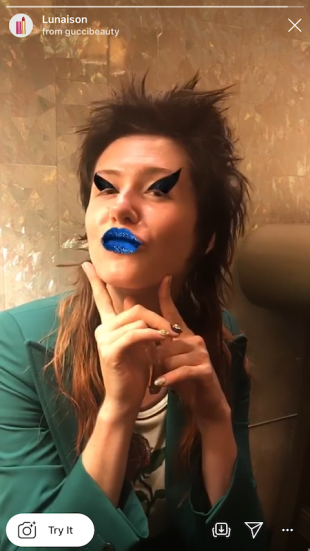
When viewing an AR filter for Instagram Stories, there’s a “try it” button on the bottom left-hand side of the screen. Users can save the filter to use later by pressing the “upload” button. That’s the first button on the bottom right-hand side of the screen.
Best examples of Instagram AR filters
Here are five examples that show how different brands are getting creative with AR filters.
Aritzia
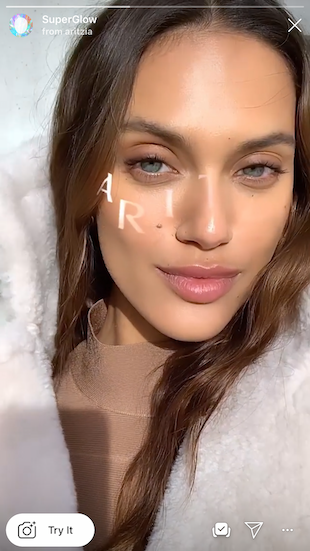
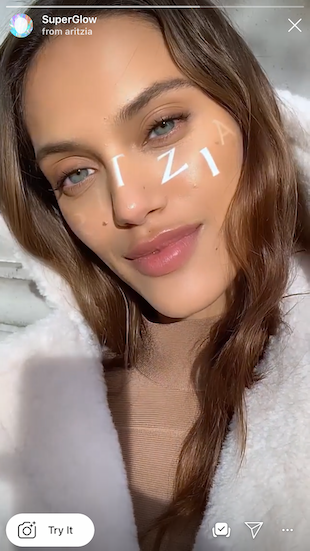
Aritzia created the SuperGlow filter. This custom filter increases brand awareness and recognition.
Coca-Cola Poland
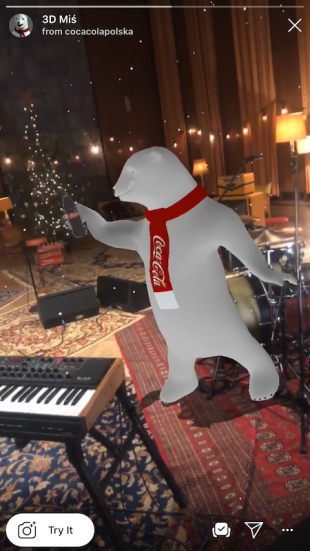
Coca-Cola Poland uses an AR filter to digitally superimpose the brand’s polar bear on top of the real world.
Ines Longevial
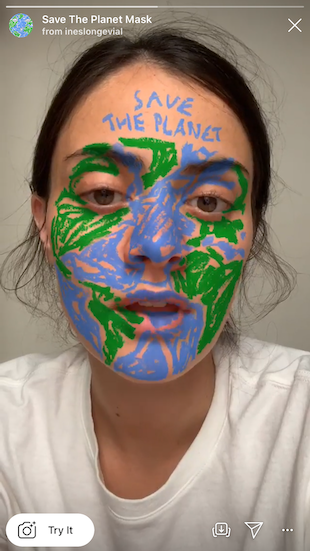
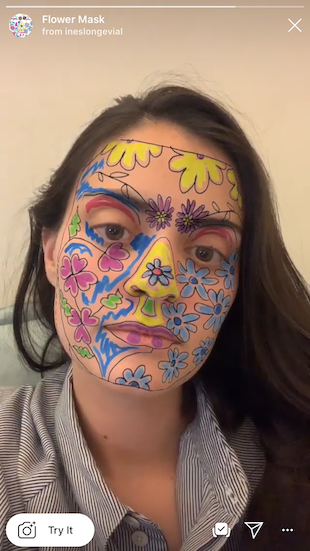
This Paris-based artist publishes artistic AR filters and shows just how creative brands can get with custom filters. She also uses this tool to show her support for social causes.
Ray-Ban
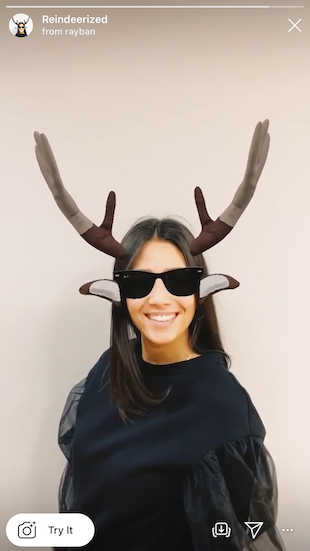
Ray-Ban’s custom Reindeerized filter is a playful way to interact with the brand. It’s also a way to virtually try on a Ray Bans product, which is super helpful for customers looking to purchase Ray Bans online.
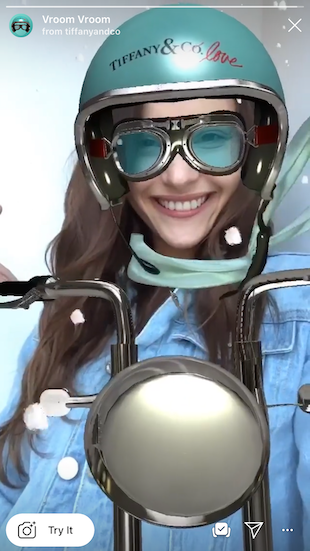
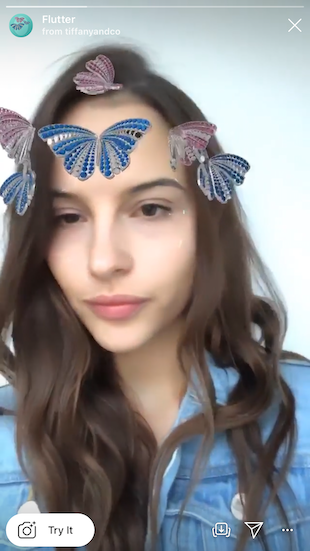
Tiffany and Co.
Tiffany and Co.’s custom filters incorporate the business’s branding.
How to make an AR filter with Spark AR Studios
This step-by-step guide shows you how to start creating custom filters for Instagram Stories.
Step 1: Download Spark AR Studio
Spark AR Studio is the easy-to-use platform you need to create custom filters and effects. Currently, it’s available for Mac and Windows.
Step 2: Decide on your effect
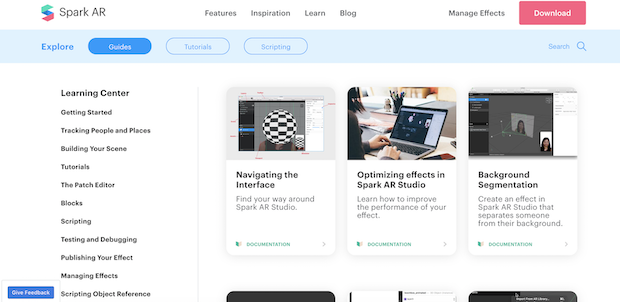
Next, walk through the tutorials in the Learning Center to get a feel for the program’s interface. Once you’re ready to get started, decide whether you’ll create a filter from scratch or choose from one of the eight templates.
We’re going to walk through the World Object template. This involves putting a 3D object into the real world, just like Coca-Cola Poland did with its polar bear.
Download your free pack of 20 customizable Instagram Stories templates now. Save time and look professional while promoting your brand in style.
Download the templates now!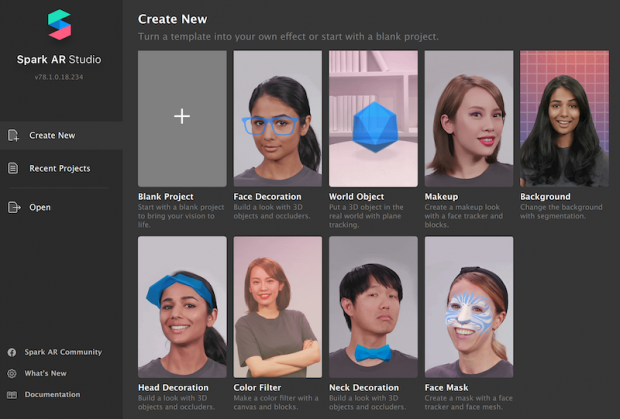
Step 3: Getting started
You’ll see a placeholder object in the central panel when you open the template. That central panel is called the Viewport. This is where you’ll build your filter.
The iPhone 8 in the corner is the Simulator. This is where you’ll preview your work. Using the dropdown, you can change the Simulator from an iPhone 8 to another device.
To the left is the Scene panel. You’ll use the options here to edit your Instagram Stories AR filters.
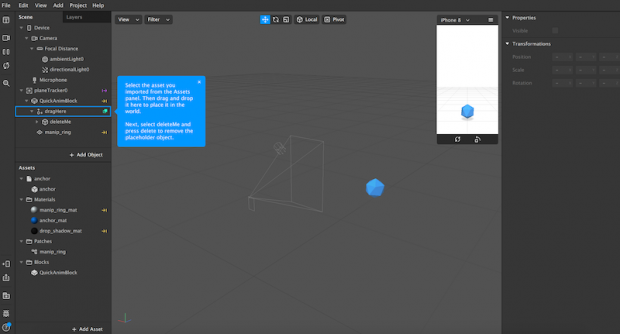
Step 4: Upload a 3D asset
Choose a 3D asset for your filter from the AR Library or import your own. For this guide, we are importing a free asset from the AR Library.
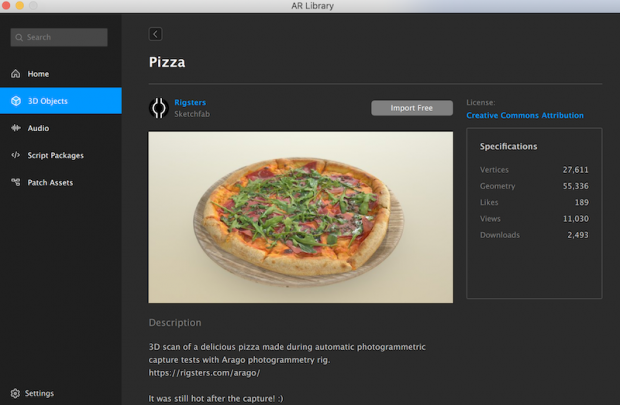
The AR Library also allows you to choose from free audio files, animations and more.
Step 5: Edit the behavior of the uploaded graphic
Now, you’ll see your uploaded asset—in our case, a rotating pizza—in the Viewport. Using the Scene panel, edit how it looks, moves and interacts with the real-world. The edits will result in your custom AR filter.
For example, you can change the colour and intensity of ambient light. The below images show the 3D asset without ambient lighting (top) and with ambient lighting (below).
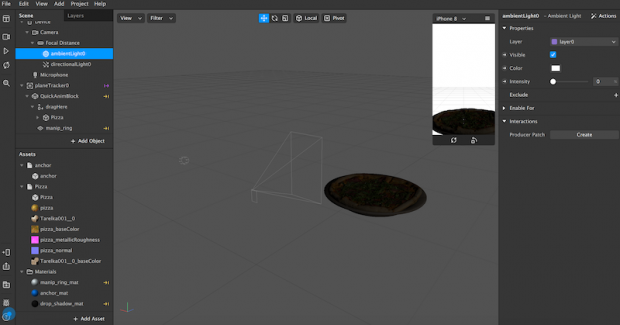
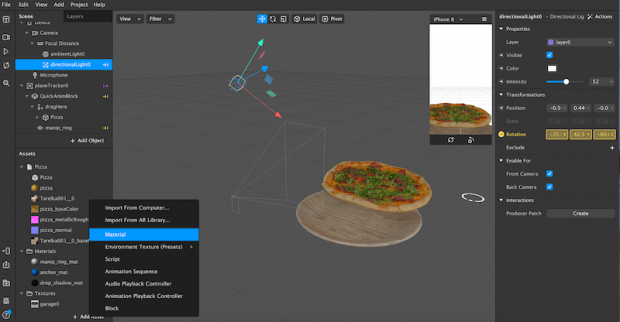
As you explore the Scene panel on the left, you’ll see that you can also:
- Change the directional light to give a 3D object more depth.
- Choose whether the effect is available for the front camera, the back camera, or both.
- Alter the animation of the uploaded 3D object.
- Add more elements to your effect, like additional animations, textures and materials.
Step 6: Test your effect
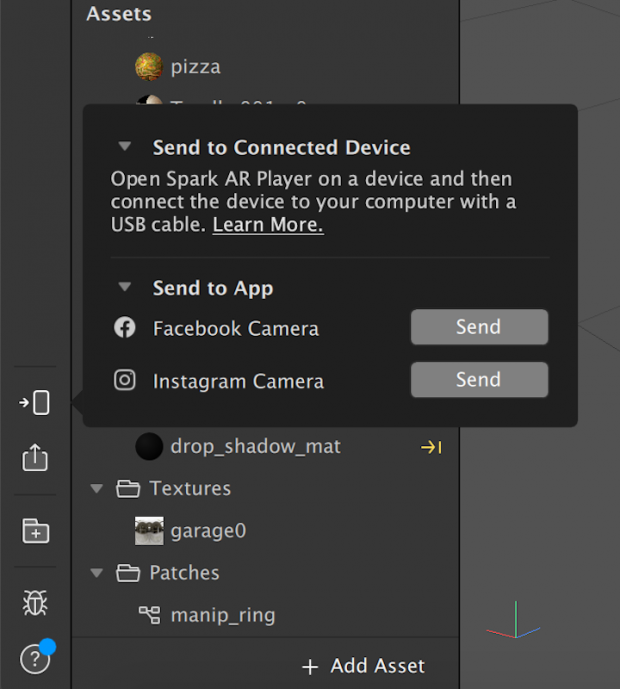
You can send your test file to Instagram or Facebook to see how it works in Instagram Stories or Facebook Stories. Or you can download the Spark AR Player app.
Step 7: Publish your effect
Now, press the “upload” button in the bottom left-hand corner. You’ll find it right below the “test on device” button.
Keep in mind that your new effect won’t be published immediately. First, your creation will be reviewed to make sure it meets Spark AR’s policies and guidelines. This review process might only take a few days, or it could take up to one week.
Spark AR also has more details in its Learning Center on submitting newly created effects for approval.
Step 8: Keep learning
As you familiarize yourself with this platform, you’ll quickly learn how to work with its other templates—or how to create an AR filter on a blank canvas.
Need more guidance? Curious about face filters, lighting filters or other AR effects? Spark AR has tons of useful guides in its Learning Center:
- Navigate Spark AR’s tools and create your unique AR filter.
- Understand face tracking and create an effect that responds to movement.
- Make your filter responsive to someone’s touch.
- Add audio.
Now, it’s your turn. If you think creating your own AR filter for Instagram Stories is right for your brand, it’s time to get creative. Good luck!
The post How to Make Your Own Instagram AR Filters: A Step-by-Step Guide appeared first on Hootsuite Social Media Management.
Categories
- 60% of the time… (1)
- A/B Testing (2)
- Ad placements (3)
- adops (4)
- adops vs sales (5)
- AdParlor 101 (43)
- adx (1)
- algorithm (1)
- Analysis (9)
- Apple (1)
- Audience (1)
- Augmented Reality (1)
- authenticity (1)
- Automation (1)
- Back to School (1)
- best practices (2)
- brand voice (1)
- branding (1)
- Build a Blog Community (12)
- Case Study (3)
- celebrate women (1)
- certification (1)
- Collections (1)
- Community (1)
- Conference News (1)
- conferences (1)
- content (1)
- content curation (1)
- content marketing (1)
- contests (1)
- Conversion Lift Test (1)
- Conversion testing (1)
- cost control (2)
- Creative (6)
- crisis (1)
- Curation (1)
- Custom Audience Targeting (4)
- Digital Advertising (2)
- Digital Marketing (6)
- DPA (1)
- Dynamic Ad Creative (1)
- dynamic product ads (1)
- E-Commerce (1)
- eCommerce (2)
- Ecosystem (1)
- email marketing (3)
- employee advocacy program (1)
- employee advocates (1)
- engineers (1)
- event marketing (1)
- event marketing strategy (1)
- events (1)
- Experiments (21)
- F8 (2)
- Facebook (64)
- Facebook Ad Split Testing (1)
- facebook ads (18)
- Facebook Ads How To (1)
- Facebook Advertising (30)
- Facebook Audience Network (1)
- Facebook Creative Platform Partners (1)
- facebook marketing (1)
- Facebook Marketing Partners (2)
- Facebook Optimizations (1)
- Facebook Posts (1)
- facebook stories (1)
- Facebook Updates (2)
- Facebook Video Ads (1)
- Facebook Watch (1)
- fbf (11)
- first impression takeover (5)
- fito (5)
- Fluent (1)
- Get Started With Wix Blog (1)
- Google (9)
- Google Ad Products (5)
- Google Analytics (1)
- Guest Post (1)
- Guides (32)
- Halloween (1)
- holiday marketing (1)
- Holiday Season Advertising (7)
- Holiday Shopping Season (4)
- Holiday Video Ads (1)
- holidays (4)
- Hootsuite How-To (3)
- Hootsuite Life (1)
- how to (5)
- How to get Instagram followers (1)
- How to get more Instagram followers (1)
- i don't understand a single thing he is or has been saying (1)
- if you need any proof that we're all just making it up (2)
- Incrementality (1)
- influencer marketing (1)
- Infographic (1)
- Instagram (39)
- Instagram Ads (11)
- Instagram advertising (8)
- Instagram best practices (1)
- Instagram followers (1)
- Instagram Partner (1)
- Instagram Stories (2)
- Instagram tips (1)
- Instagram Video Ads (2)
- invite (1)
- Landing Page (1)
- link shorteners (1)
- LinkedIn (22)
- LinkedIn Ads (2)
- LinkedIn Advertising (2)
- LinkedIn Stats (1)
- LinkedIn Targeting (5)
- Linkedin Usage (1)
- List (1)
- listening (2)
- Lists (3)
- Livestreaming (1)
- look no further than the new yorker store (2)
- lunch (1)
- Mac (1)
- macOS (1)
- Marketing to Millennials (2)
- mental health (1)
- metaverse (1)
- Mobile App Marketing (3)
- Monetizing Pinterest (2)
- Monetizing Social Media (2)
- Monthly Updates (10)
- Mothers Day (1)
- movies for social media managers (1)
- new releases (11)
- News (72)
- News & Events (13)
- no one knows what they're doing (2)
- OnlineShopping (2)
- or ari paparo (1)
- owly shortener (1)
- Paid Media (2)
- People-Based Marketing (3)
- performance marketing (5)
- Pinterest (34)
- Pinterest Ads (11)
- Pinterest Advertising (8)
- Pinterest how to (1)
- Pinterest Tag helper (5)
- Pinterest Targeting (6)
- platform health (1)
- Platform Updates (8)
- Press Release (2)
- product catalog (1)
- Productivity (10)
- Programmatic (3)
- quick work (1)
- Reddit (3)
- Reporting (1)
- Resources (34)
- ROI (1)
- rules (1)
- Seamless shopping (1)
- share of voice (1)
- Shoppable ads (4)
- Skills (28)
- SMB (1)
- SnapChat (28)
- SnapChat Ads (8)
- SnapChat Advertising (5)
- Social (169)
- social ads (1)
- Social Advertising (14)
- social customer service (1)
- Social Fresh Tips (1)
- Social Media (5)
- social media automation (1)
- social media content calendar (1)
- social media for events (1)
- social media management (2)
- Social Media Marketing (49)
- social media monitoring (1)
- Social Media News (4)
- social media statistics (1)
- social media tracking in google analytics (1)
- social media tutorial (2)
- Social Toolkit Podcast (1)
- Social Video (5)
- stories (1)
- Strategy (601)
- terms (1)
- Testing (2)
- there are times ive found myself talking to ari and even though none of the words he is using are new to me (1)
- they've done studies (1)
- this is also true of anytime i have to talk to developers (1)
- tiktok (8)
- tools (1)
- Topics & Trends (3)
- Trend (12)
- Twitter (15)
- Twitter Ads (5)
- Twitter Advertising (4)
- Uncategorised (9)
- Uncategorized (13)
- url shortener (1)
- url shorteners (1)
- vendor (2)
- video (10)
- Video Ads (7)
- Video Advertising (8)
- virtual conference (1)
- we're all just throwing mountains of shit at the wall and hoping the parts that stick don't smell too bad (2)
- web3 (1)
- where you can buy a baby onesie of a dog asking god for his testicles on it (2)
- yes i understand VAST and VPAID (1)
- yes that's the extent of the things i understand (1)
- YouTube (13)
- YouTube Ads (4)
- YouTube Advertising (9)
- YouTube Video Advertising (5)
